In today’s highly distributed word, where monolithic architectures are increasingly replaced with multiple, smaller, interconnected services (for better or worse), proxy and load balancing technologies seem to have a renaissance. Beside the older players, there are several new proxy technologies popping up in recent years, implemented in various technologies, popularizing themselves with different features, such as easy integration to certain cloud providers (“cloud-native”), high performance and low memory footprint, or dynamic configuration.
Arguably the two most popular “classic” proxy technologies are NGINX (C) and HAProxy (C), while some of the new kids on the block are Zuul (Java), Linkerd (Rust), Traefik (Go), Caddy (Go) and [Envoy (C++).
All of these technologies have different feature sets, and are targeting some specific scenarios or hosting environments (for example Linkerd is fine-tuned for being used in Kubernetes).
In this post I’m not going to do a comparison of these, but rather just focus on one specific scenario: how to use Envoy as a load balancer for a service running in Kubernetes.
Envoy is a “high performance C++ distributed proxy”, originally implemented at Lyft, but since then have gained a wide adoption. It’s high-performant, has a low resource footprint, it supports dynamic configuration managed by a “control plane” API, and provides some advanced features such as various load balancing algorithms, rate limiting, circuit braking, and shadow mirroring.
I chose Envoy as a load balancer proxy for a number of reasons.
- Besides being able to be controlled dynamically with a control plane API, it also supports a simple, hard-coded YAML-based configuration, which was convenient for my purposes, and made it easy to get started.
- It has built-in support for a service discovery technique it calls STRICT_DNS, which builds on querying a DNS record, and expecting seeing an A record with an IP address for every node of the upstream cluster. This made it easy to use with a headless service in Kubernetes.
- It supports various load balancing algorithms, among others “Least Request”.
Before starting to use Envoy, I was accessing my service in Kubernetes through a [service] object of the type [LoadBalancer], which is a pretty typical way to access services from the outside in Kubernetes. The exact way a load balancer service works depends on the hosting environment—if it supports it in the first place. I was using the Google Kubernetes Engine, where every load balancer service is mapped to a TCP-level Google Cloud load balancer, which only supports a round robin load balancing algorithm.
In my case this was an issue, because my service had the following characteristics.
- The requests were long running with varied response times, ranging from 100ms to seconds.
- The processing of the requests was CPU-intensive, practically the processing of one request used 100% of one CPU core.
- Processing many requests in parallel degraded the response time. (This was due to the internals of how this service worked, it couldn’t efficiently run more than a handful requests in parallel.)
Due to the above characteristics, the round robin load balancing algorithm was not a good fit, because often—by chance—multiple requests ended up on the same node, which made the average response times much worse than what the cluster would’ve been capable achieving, given a more uniformly spread out load.
In the remainder of this post I will describe the steps necessary to deploy Envoy to be used as a load balancer in front of a service running in Kubernetes.
1. Create the headless service for our application
In Kubernetes there is a specific kind of service called a headless service, which happens to be very convenient to be used together with Envoy’s STRICT_DNS service discovery mode.
A headless service doesn’t provide a single IP and load balancing to the underlying pods, but rather it just has DNS configuration which gives us an A record with the pod’s IP address for all the pods matching the label selector.
This service type is intended to be used in scenarios when we want to implement load balancing, and maintaining the connections to the upstream pods ourselves, which is exactly what we can do with Envoy.
We can create a headless service by setting the .spec.clusterIP field to "None". So assuming that our application pods have the label app with the value myapp, we can create the headless service with the following yaml.
apiVersion: v1
kind: Service
metadata:
  name: myapp
spec:
  clusterIP: None
  ports:
  - name: http
    port: 80
    targetPort: http
    protocol: TCP
  selector:
    app: myapp
(The name of the Service does not have to be equal to the name of our application nor the app label, but it’s a good convention to follow.)
Now if we check the DNS records for our service inside the Kubernetes cluster, we’ll see the separate A records with the IP addresses. If we have 3 pods, we’ll see a DNS summary similar to this.
$ nslookup myapp
Server:         10.40.0.10
Address:        10.40.0.10#53

Non-authoritative answer:
Name:   myapp.namespace.svc.cluster.local
Address: 10.36.224.5
Name:   myapp.namespace.svc.cluster.local
Address: 10.38.187.17
Name:   myapp.namespace.svc.cluster.local
Address: 10.38.1.8
And the way the STRICT_DNS service discovery of Envoy works is that it maintains the IP address of all the A records returned by the DNS, and it refreshes the set of IPs every couple of seconds.
2. Create the Envoy image
The simplest way to use Envoy without providing the control plane in the form of a dynamic API is to add the hardcoded configuration to a static yaml file.
The following is a basic configuration that load balances to the IP addresses given by the domain name myapp.
admin:
  access_log_path: /tmp/admin_access.log
  address:
    socket_address: { address: 0.0.0.0, port_value: 9901 }

static_resources:
  listeners:
  - name: listener_0
    address:
      socket_address: { address: 0.0.0.0, port_value: 80 }
    filter_chains:
    - filters:
      - name: envoy.http_connection_manager
        config:
          stat_prefix: ingress_http
          route_config:
            name: local_route
            virtual_hosts:
            - name: local_service
              domains: ["*"]
              routes:
              - match: { prefix: "/" }
                route: { host_rewrite: myapp, cluster: myapp_cluster, timeout: 60s }
          http_filters:
          - name: envoy.router
  clusters:
  - name: myapp_cluster
    connect_timeout: 0.25s
    type: STRICT_DNS
    dns_lookup_family: V4_ONLY
    lb_policy: LEAST_REQUEST
    hosts: [{ socket_address: { address: myapp, port_value: 80 }}]
Note the following parts.
type: STRICT_DNS: Here we’re specifying the service discovery type. It’s important to set it toSTRICT_DNS, because this works well together with the headless service we’ve set up.lb_policy: LEAST_REQUEST: We can choose from various load balancing algorithms, probablyROUND_ROBINandLEAST_REQUESTare the most common. (Keep in mind thatLEAST_REQUESTis not checking all upstream nodes, but it only chooses from 2 randomly picked options.)hosts: [{ socket_address: { address: myapp, port_value: 80 }}]: This is the part where we specify with theaddressfield the domain name from which Envoy will have to get the A records to route to.
You can find more information about the various config parameters in the docs.
Now we have to put the following Dockerfile next to the envoy.yaml config file.
FROM envoyproxy/envoy:latest
COPY envoy.yaml /etc/envoy.yaml
CMD /usr/local/bin/envoy -c /etc/envoy.yaml
The last step is building the image, and pushing it somewhere (like the Docker hub, or the container registry of a cloud provider) to be able to use it from Kubernetes.Assuming I’d like to push this to my personal Docker hub account, I could do it with the following commands.
$ docker build -t markvincze/myapp-envoy:1 .
$ docker push markvincze/myapp-envoy:1
(3. Optional: make the Envoy image parameterizable)
If we’d like to be able to customize some parts of the Envoy configuration with environment variables without rebuilding the Docker image, we can do some env var substitution in the yaml config. Let’s say we’d like to be able to customize the name of the headless service we’re proxying to, and the load balancer algorithm, then we’d have to modify the yaml config the following way.
admin:
  access_log_path: /tmp/admin_access.log
  address:
    socket_address: { address: 0.0.0.0, port_value: 9901 }

static_resources:
  listeners:
  - name: listener_0
    address:
      socket_address: { address: 0.0.0.0, port_value: 80 }
    filter_chains:
    - filters:
      - name: envoy.http_connection_manager
        config:
          stat_prefix: ingress_http
          route_config:
            name: local_route
            virtual_hosts:
            - name: local_service
              domains: ["*"]
              routes:
              - match: { prefix: "/" }
                route: { host_rewrite: myapp, cluster: myapp_cluster, timeout: 60s }
          http_filters:
          - name: envoy.router
  clusters:
  - name: myapp_cluster
    connect_timeout: 0.25s
    type: STRICT_DNS
    dns_lookup_family: V4_ONLY
    lb_policy: ${ENVOY_LB_ALG}
    hosts: [{ socket_address: { address: ${SERVICE_NAME}, port_value: 80 }}]
Then implement a little shell script (docker-entrypoint.sh) in which we do the env var substitution.
#!/bin/sh
set -e

echo "Generating envoy.yaml config file..."
cat /tmpl/envoy.yaml.tmpl | envsubst \$ENVOY_LB_ALG,\$SERVICE_NAME > /etc/envoy.yaml

echo "Starting Envoy..."
/usr/local/bin/envoy -c /etc/envoy.yaml
And change our Dockerfile to run this script instead of directly starting Envoy.
FROM envoyproxy/envoy:latest

COPY envoy.yaml /tmpl/envoy.yaml.tmpl
COPY docker-entrypoint.sh /

RUN chmod 500 /docker-entrypoint.sh

RUN apt-get update && \
    apt-get install gettext -y

ENTRYPOINT ["/docker-entrypoint.sh"]
Keep in mind that if you use this approach, you have to specify these env vars in the Kubernetes deployment, otherwise they will be empty.
4. Create the Envoy deployment
Finally we have to create a deployment for Envoy itself.
apiVersion: v1
kind: Service
metadata:
  name: myapp-envoy
  labels:
    app: myapp-envoy
spec:
  type: ClusterIP
  ports:
  - name: http
    port: 80
    targetPort: http
    protocol: TCP
  selector:
    app: myapp-envoy
---
apiVersion: extensions/v1beta1
kind: Deployment
metadata:
  name: myapp-envoy
  labels:
    app: myapp-envoy
spec:
  selector:
    matchLabels:
      app: myapp-envoy
  template:
    metadata:
      labels:
        app: myapp-envoy
    spec:
      containers:
      - name: myapp-envoy
        image: mydockerhub/mycustomenvoy
        imagePullPolicy: Always
        env:
        - name: "ENVOY_LB_ALG"
          value: "LEAST_REQUEST"
        - name: "SERVICE_NAME"
          value: "myapp"
        ports:
        - name: http
          containerPort: 80
        - name: envoy-admin
          containerPort: 9901
(We only need the env variables if we made our Envoy Docker image parameterizable.)
After applying this yaml, the Envoy proxy should be operational, and you can access the underlying service by sending the requests to the main port of the Envoy service.
In this example I only added a service of type ClusterIP, but you can also use a LoadBalancer service, or an Ingress object if you want to access the proxy from outside the cluster.
The following diagram illustrates the architecture of the whole setup.
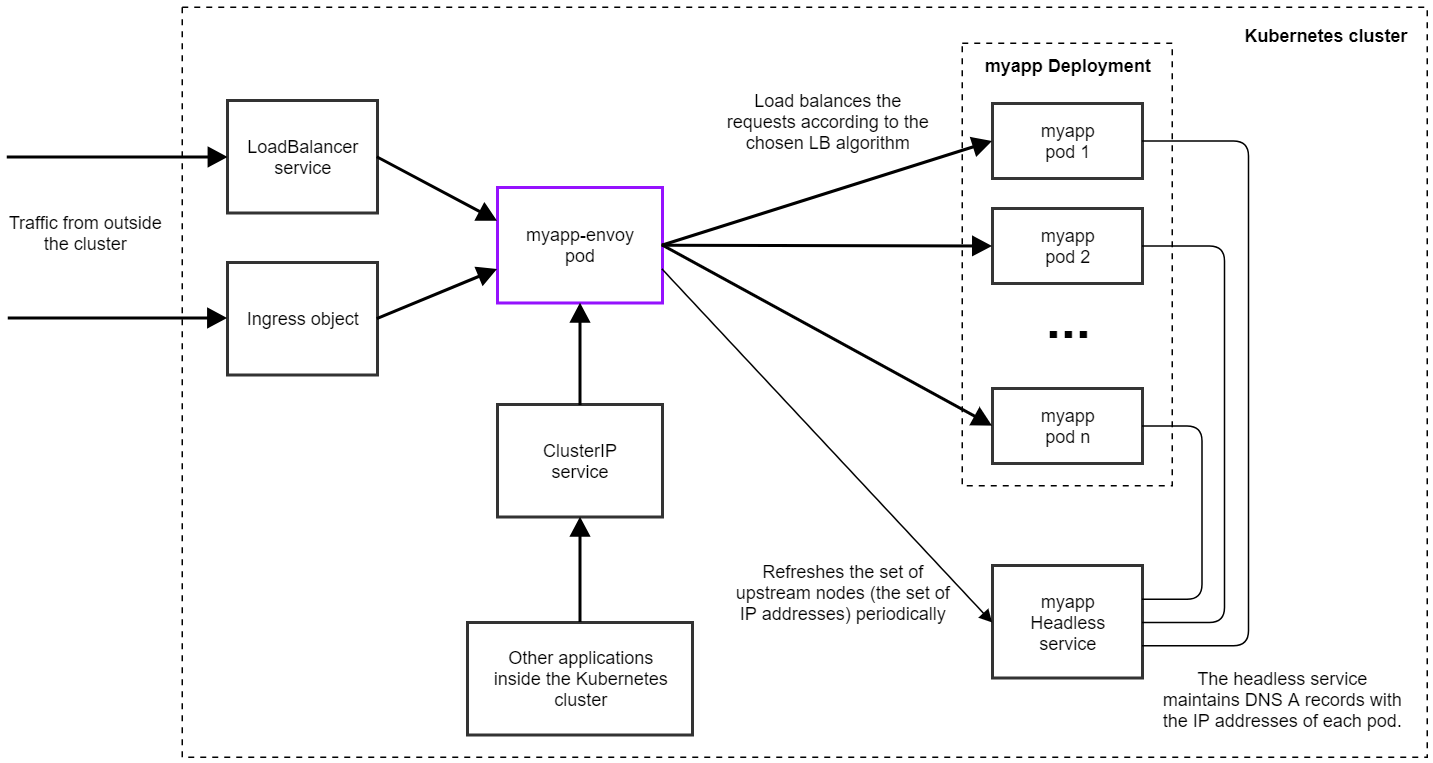
The image only shows one single Envoy pod, but you can scale it up to have more instances if necessary. And of course you can use a Horizontal Pod Autoscaler to automatically create more replicas as needed. (All instances will be autonomous and independent of each other.)
In practice you’ll probably need much fewer instances for the proxy than for the underlying service. In the current production application we’re using Envoy with, we’re serving ~1000 requests/seconds on ~400 upstream pods, but we only have 3 instances of Envoy running, with ~10% CPU load.
Troubleshooting and Monitoring
In the Envoy configuration file you can see an admin: section, which configures Envoy’s admin endpoint. That can be used for checking various diagnostic information about the proxy.
(If you don’t have a service publishing the admin port—9901 by default—you can still access it by port-forwarding to a pod with kubectl. Assuming that one of the Envoy pods is called myapp-envoy-656c8d5fff-mwff8, then you can start port-fowarding with the command kubectl port-forward myapp-envoy-656c8d5fff-mwff8 9901. Then you can access the page at http://localhost:9901.)
Some of the useful endpoints:
/config_dump: Prints the complete configuration of the proxy, which is useful to verify if the correct config ended up on the pod./clusters: Shows all the upstream nodes that Envoy discovered, and the number of requests processed for each of them. This is useful for example for checking if the load balancing algorithm works properly.
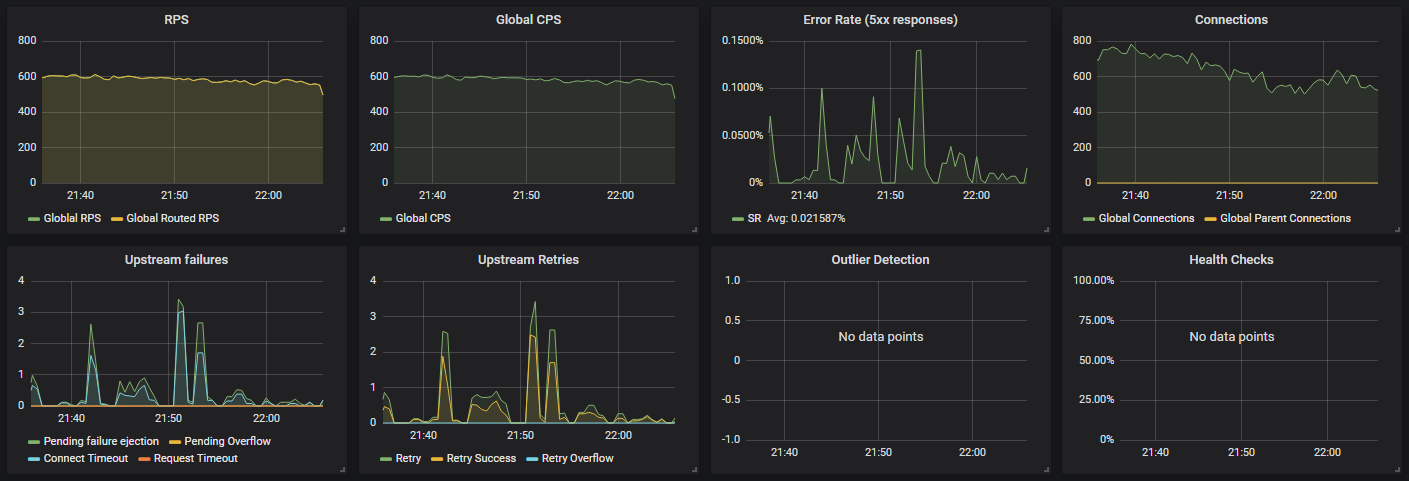
One way to do monitoring is to use Prometheus to scrape the stats from the proxy pods. Envoy has built-in support for this, the Prometheus stats are published on the admin port at the route /stats/prometheus.
You can download a Grafana dashboard visualizing these metrics from this repository, which will give you a set of graphs similar to the following.
A word on the load balancing algorithms
The load balancing algorithm can have significant effect on the overall performance of our cluster. Using a least request algorithm can be beneficial with services for which an even spread of the load is necessary, for example when a service is CPU-intensive, and gets easily overloaded.On the other hand, least request has the problem that if one of the nodes start failing for some reason, and the failure response times are quick, then the load balancer will send a disproportionately large portion of the requests to the failing node—something which wouldn’t be a problem with round robin.
I made some benchmarks with a dummy API and compared the round robin and the least request LB algorithms. It turned out that least request can bring a significant improvement in the overall performance.
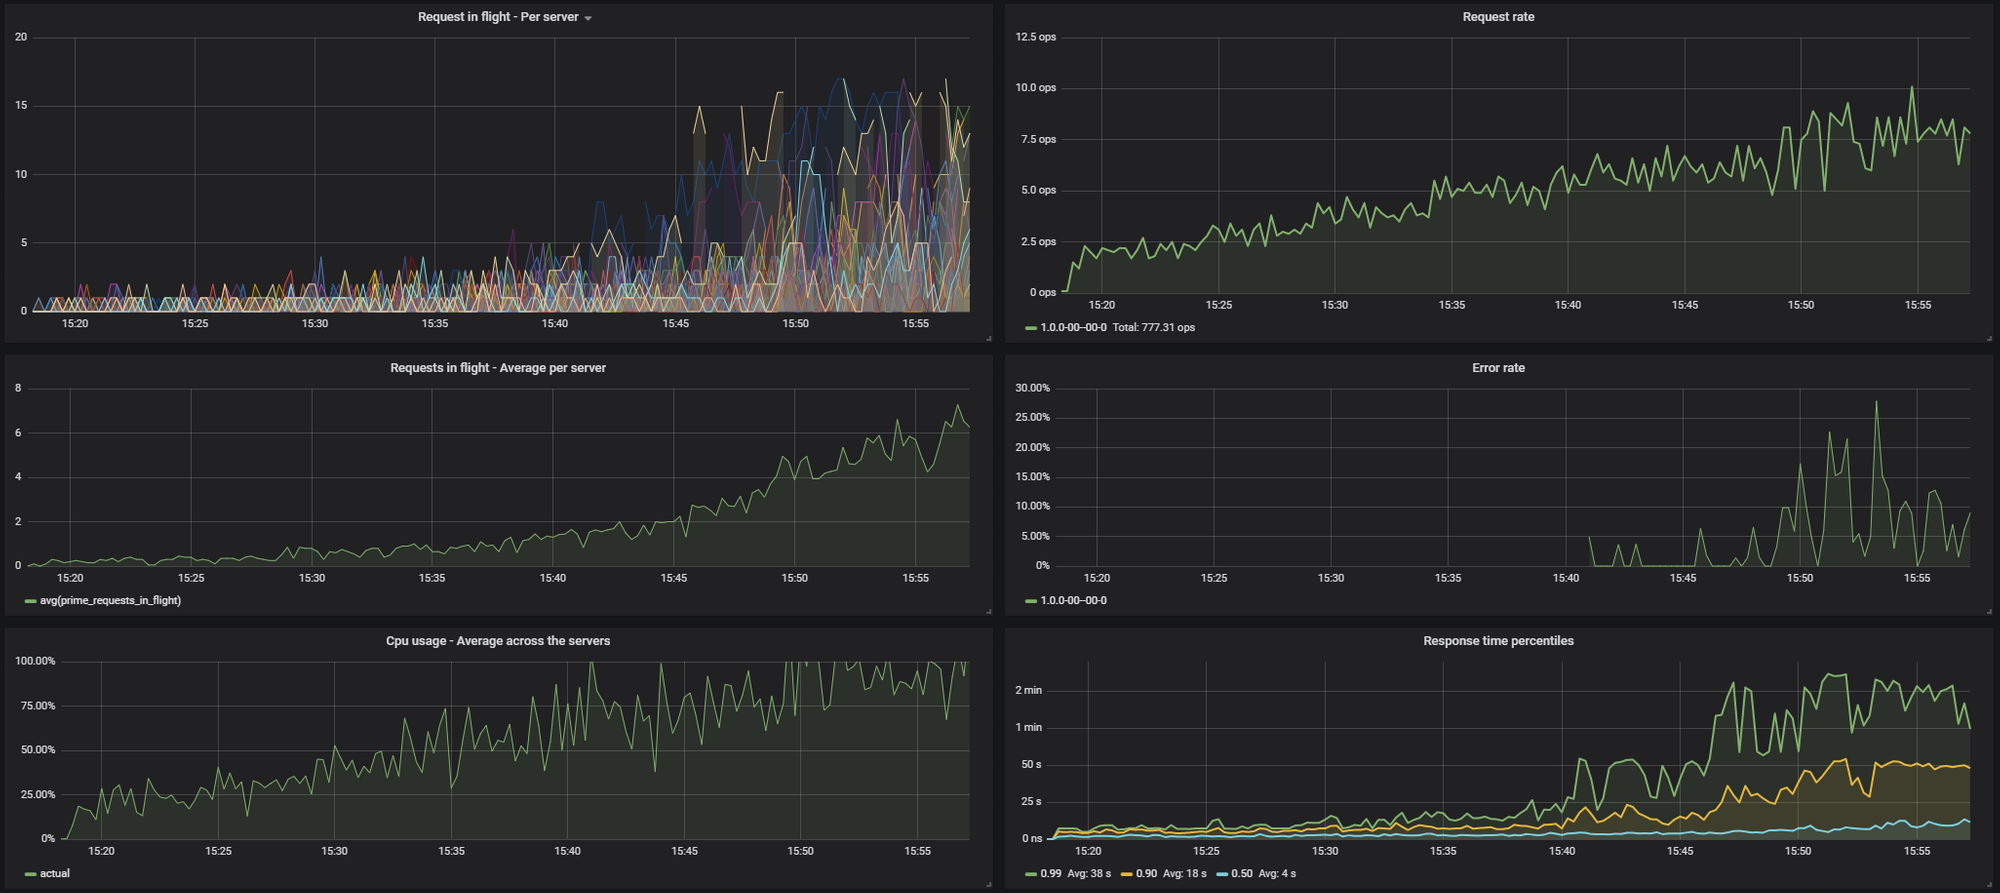
I was benchmarking the API for ~40 minutes with a continuously increasing input traffic. Throughout the benchmark I collected the following metrics:
- Number of requests being executed (“requests in flight”), broken down by servers
- Number of requests being executed, average per server
- Incoming request rate (this was increasing every 5 minutes)
- Error rate (normally there weren’t any, but when things started to slow down, this started to show some timeouts)
- Response time percentiles (0.50, 0.90 and 0.99) recorded on the servers
The stats looked like this with ROUND_ROBIN.
These were the results with LEAST_REQUEST:
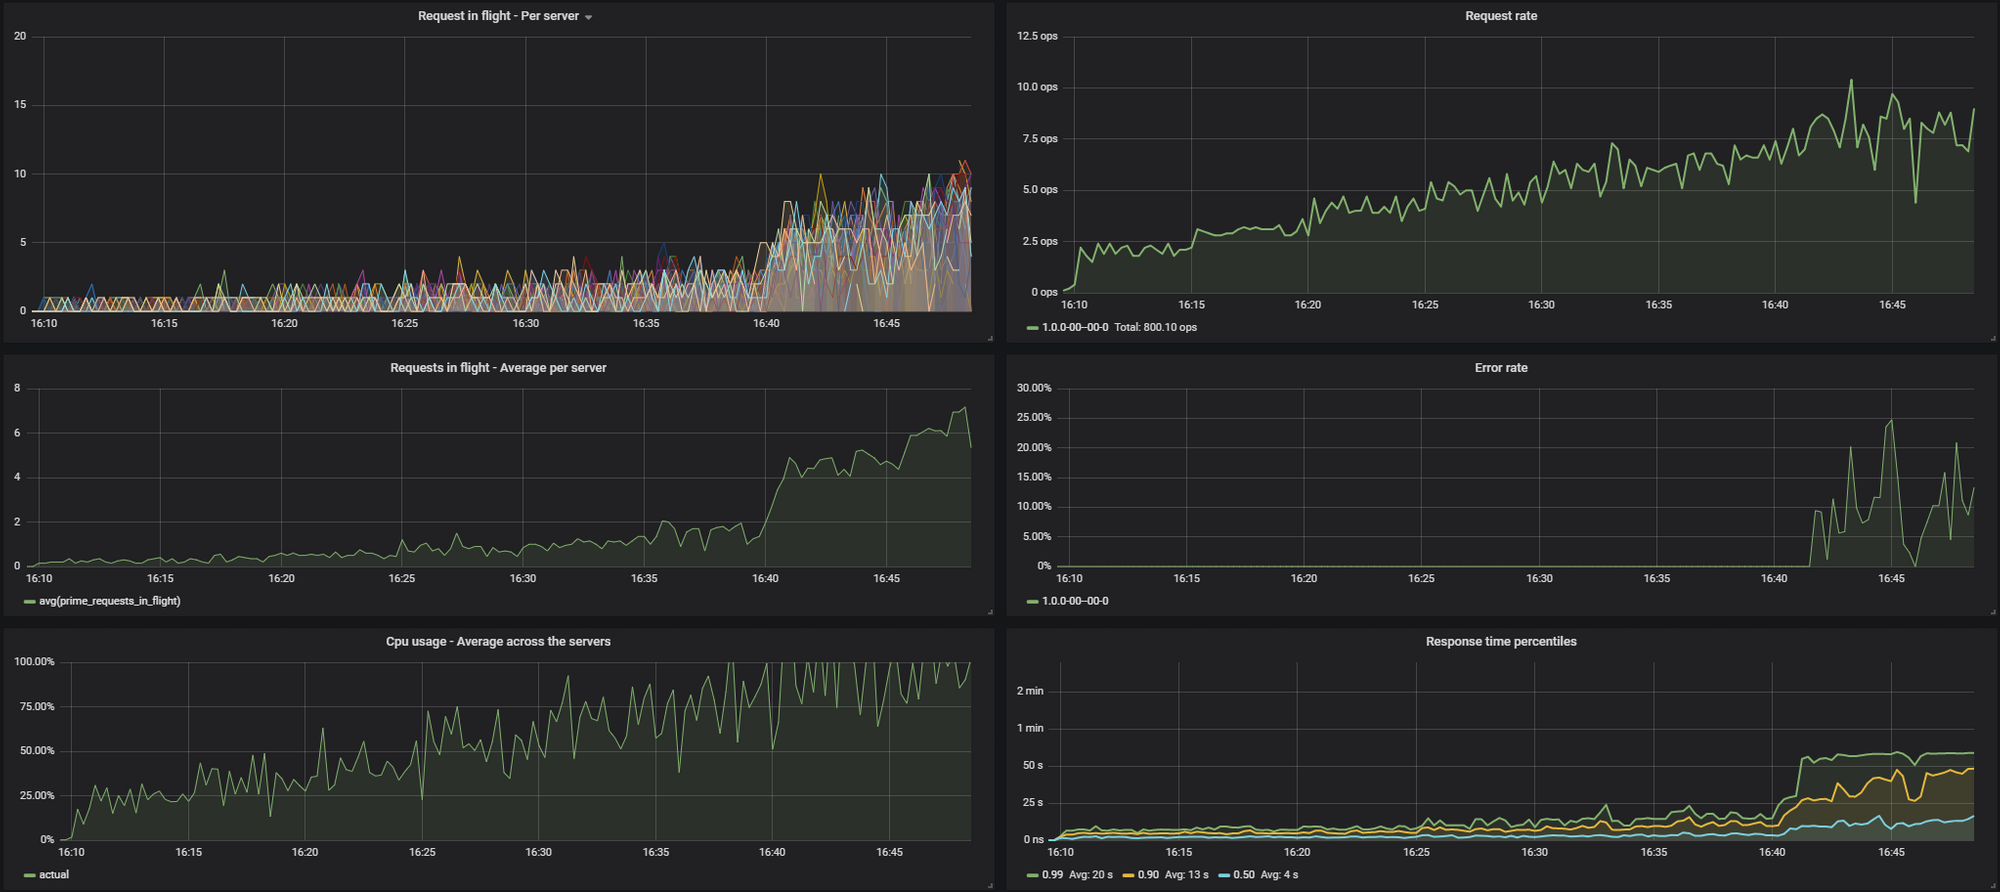
You can see on the results that LEAST_REQUEST can lead to a much smoother distribution of the traffic across the nodes, and thus a lower average response time at high load.
The exact improvement will depend on the actual API, so I definitely recommend you to do the benchmark with your own service too to be make a decision.
(Earlier I mentioned that when using LEAST_REQUEST, Envoy will not look at every node in the cluster when selecting the one to send a certain request to, but rather just looks at 2 randomly picked options, and sends the request to the one that has the fewer pending requests.
I was curious if actually doing a full O(n) scan and picking among all the nodes the one with the least amount of requests would bring a further improvement, so I implemented this feature in a fork of Envoy, and did the same benchmark.
It turns out that this can indeed further improve the uniformity of the load, and the resource utilization, thereby decreasing the response times at high load. There is an ongoing discussion about this topic in this issue.)
Summary
I hope this introduction will be helpful for getting started with using Envoy in Kubernetes. By the way, this is not the only way to achieve least request load balancing on Kubernetes. There are various ingress controllers (one of which is Ambassador, which builds on top of Envoy) that can do the same.
If you have any other suggestions, feedback is welcome!